Easy Blackstone Chicken Recipes for Beginners – Juicy, Flavorful, and Foolproof!
Table of Contents
You’ve probably seen people cooking on a Blackstone griddle and wondered if it’s really worth the hype. The truth is, once you’ve cooked your first batch of Blackstone chicken, you’ll understand why so many home cooks swear by it. There’s something almost magical about the way the griddle sears the outside while keeping the inside moist and full of flavor.
Close your eyes for a second and picture this:
The sun is dipping low, the air smells faintly of smoky spices, and your Blackstone is alive with the sound of sizzling chicken. A burst of garlicky steam rises as you flip each piece, revealing a golden crust that practically begs to be bitten into. The people you love are hovering nearby, pretending they’re not impatiently waiting to dig in. That moment, right there, is why cooking Blackstone chicken is about more than just making a meal — it’s about creating experiences you’ll want to repeat again and again.
Whether you’ve just unpacked your first Blackstone griddle or you’re looking to step up your cooking game, you’re in the right place. This guide will walk you through beginner-friendly recipes, expert tips, and common mistakes to avoid so you can nail your Blackstone chicken every single time.
Why Cook Chicken on a Blackstone Griddle?
If you’ve ever struggled with chicken that turned out dry, undercooked, or unevenly cooked, you’re not alone. Cooking poultry can be tricky — but a Blackstone griddle takes away much of the guesswork. Here’s why it’s such a game-changer for chicken lovers:
- Even Heat Distribution – The flat cooking surface spreads heat evenly across every inch, so you won’t have to worry about hot spots burning one side of your chicken while the other stays raw.
- Locking in Juiciness – The high, direct heat creates a quick sear, sealing in the natural juices so your Blackstone chicken stays tender and flavorful.
- Versatility for All Cuts – Whether it’s boneless breasts, juicy thighs, or drumsticks, the Blackstone handles them all like a pro.
- Beginner-Friendly Cooking – You don’t need years of grilling experience to master it. The process is straightforward, and the results are consistently impressive.
- Outdoor Cooking Enjoyment – Cooking outside means less mess in the kitchen and more fresh air while you work your magic.
Once you’ve mastered these basics, you’ll be ready to tackle recipes that taste like they came from a professional kitchen — but with the ease and comfort of home cooking.
Blackstone Cooking Basics for Beginners
Cooking chicken on a Blackstone isn’t complicated, but there are a few basics you should nail down before you fire it up. By mastering these early, you’ll avoid common pitfalls and make sure every bite of your Blackstone chicken is juicy, flavorful, and cooked to perfection.
Choosing the Right Cut of Chicken
Not all chicken cuts behave the same way on a Blackstone griddle. Picking the right one can mean the difference between a quick, weeknight meal and a slow-cooking weekend project.
- Chicken Breasts – Lean and fast-cooking, perfect for when you need a healthy dinner in under 20 minutes. Keep them from drying out by pounding them to an even thickness.
- Chicken Thighs – A little fattier, which means they stay juicy and forgiving if you leave them on the heat a bit too long. Ideal for marinades and bold seasonings.
- Drumsticks & Wings – Packed with flavor, but they take longer to cook. Best for casual weekend griddle sessions where you have more time.
Pro Tip: For beginner Blackstone chicken recipes, boneless, skinless thighs are a safe bet. They’re easy to handle, cook evenly, and pack serious flavor.

Essential Blackstone Tools for Chicken Success
The right gear makes cooking smoother, safer, and more enjoyable. Here’s what you’ll want within arm’s reach:
- Long Metal Spatulas – For flipping and moving chicken pieces without tearing the meat.
- Squeeze Bottles for Oil – Helps you control how much oil you use and makes it easy to re-grease the griddle as you cook.
- Meat Thermometer – Non-negotiable for safe poultry cooking; aim for 165°F for fully cooked Blackstone chicken.
- Griddle Scraper – Keeps your cooking surface clean between batches and removes stuck-on bits.
- Heat-Resistant Gloves – Protects your hands when working over high heat.
Prepping Your Blackstone for Chicken
A properly preheated and seasoned Blackstone griddle is the foundation of perfect chicken.
- Preheat to Medium Heat – You’re looking for about 350–375°F for chicken. This ensures you get a nice sear without burning the outside before the inside cooks through.
- Season with Oil – Apply a thin layer of high-smoke-point oil (like avocado or canola) to prevent sticking and help with browning.
- Space Your Chicken Properly – Overcrowding traps steam, which can make your chicken soggy instead of crisp. Give each piece room to breathe.
By following these steps, you’ll have a perfectly prepped griddle ready to turn simple chicken into something unforgettable.
Easy Blackstone Chicken Recipes You’ll Love
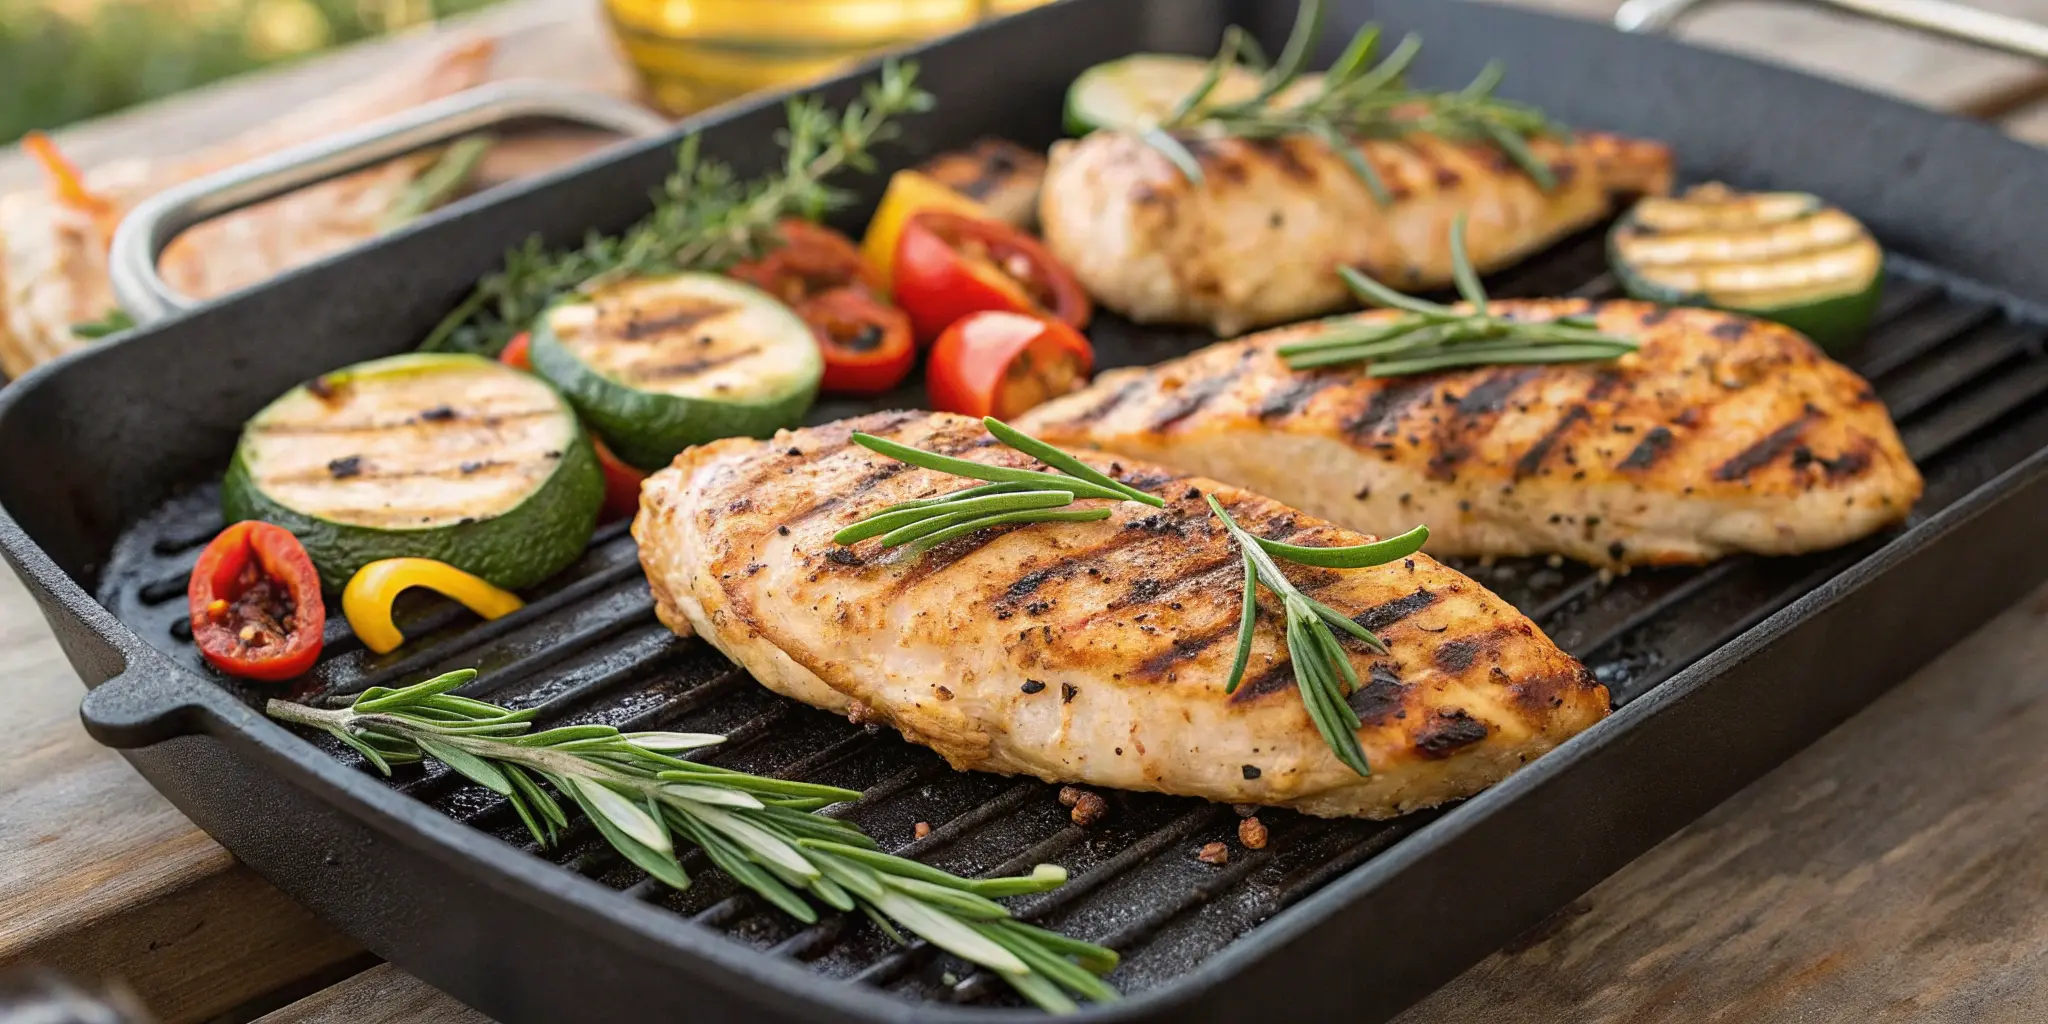
Recipe 1 – Classic Blackstone Grilled Chicken Breast
When you want something quick, healthy, and bursting with flavor, nothing beats a well-cooked chicken breast on your Blackstone griddle. This recipe is simple enough for a weeknight but impressive enough to serve to guests.
Ingredients
| Ingredient | Quantity | Notes |
|---|---|---|
| Chicken breast | 2 pieces | Boneless, skinless |
| Olive oil | 2 tbsp | For brushing |
| Salt | ½ tsp | Adjust to taste |
| Black pepper | ½ tsp | Freshly ground for best flavor |
| Garlic powder | 1 tsp | Optional for extra depth |
Instructions
- Preheat your Blackstone to medium heat (about 350–375°F).
- Pound chicken breasts to an even thickness for quicker, even cooking.
- Season generously with salt, pepper, and garlic powder.
- Brush with olive oil on both sides to prevent sticking.
- Place on the griddle and cook for 4–5 minutes per side, avoiding excessive flipping.
- Check internal temperature with a meat thermometer — you’re aiming for 165°F.
- Rest for 5 minutes before slicing to keep juices locked in.
Beginner Tip: If your chicken breast is thick, you can lower the heat slightly after searing to let the inside cook through without drying out the outside.
This recipe is the perfect starting point for learning how to control heat and timing on your Blackstone griddle. Once you master it, you can experiment with marinades, spices, and sauces to make it your own.
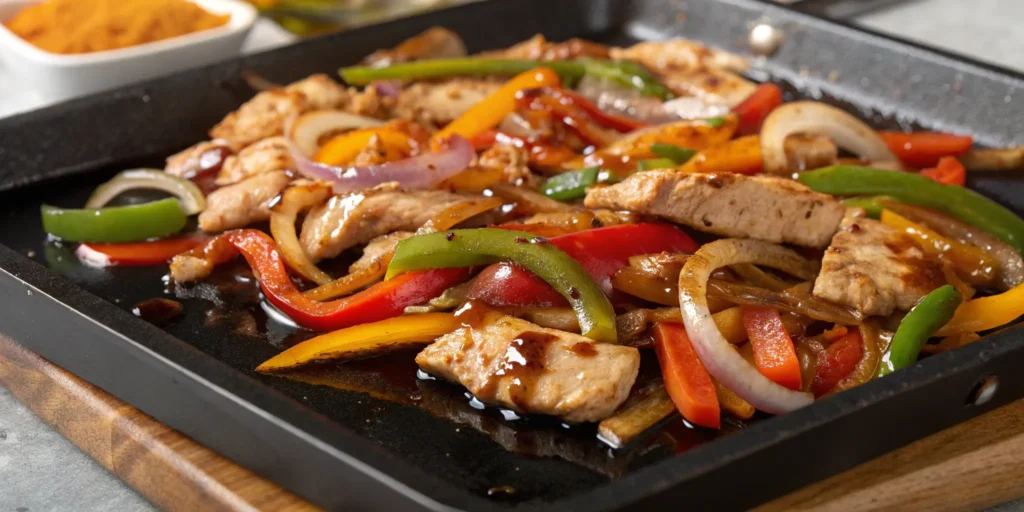
Recipe 2 – Blackstone Teriyaki Chicken Stir-Fry
If you want something that’s both savory and a little sweet, with tender chicken and crisp veggies, this stir-fry will be your new go-to. It’s perfect for weeknights, and the Blackstone’s large surface makes cooking everything at once a breeze.
Ingredients
| Ingredient | Quantity | Notes |
|---|---|---|
| Chicken thighs | 1 lb | Boneless, skinless, cut into thin strips |
| Teriyaki sauce | ½ cup | Store-bought or homemade |
| Bell peppers | 1 cup | Sliced (red, yellow, green mix) |
| Onion | ½ cup | Sliced |
| Carrots | ½ cup | Thinly sliced or julienned |
| Sesame oil | 1 tbsp | For stir-fry flavor |
| Olive oil | 1 tbsp | For cooking |
| Sesame seeds | 1 tsp | Optional garnish |
| Green onions | 2 stalks | Sliced for garnish |
Instructions
- Preheat your Blackstone to medium-high heat (around 375–400°F).
- Add olive oil to the griddle surface and let it heat up.
- Place chicken strips on one side of the griddle, seasoning lightly with salt and pepper.
- Cook chicken for 3–4 minutes per side until lightly browned.
- On the other side of the griddle, add vegetables with a drizzle of sesame oil. Toss frequently until tender-crisp.
- Combine chicken and veggies, then pour teriyaki sauce over everything. Stir well to coat.
- Cook for 1–2 more minutes, letting the sauce thicken slightly.
- Serve immediately, topped with sesame seeds and green onions.
Beginner Tip: Keep your chicken and vegetables separate at first so you can control cooking times — vegetables cook faster than meat, so adding them too early can make them soggy.
This dish is perfect served over rice or noodles, and it’s a great way to sneak more vegetables into your Blackstone chicken meals without sacrificing flavor.
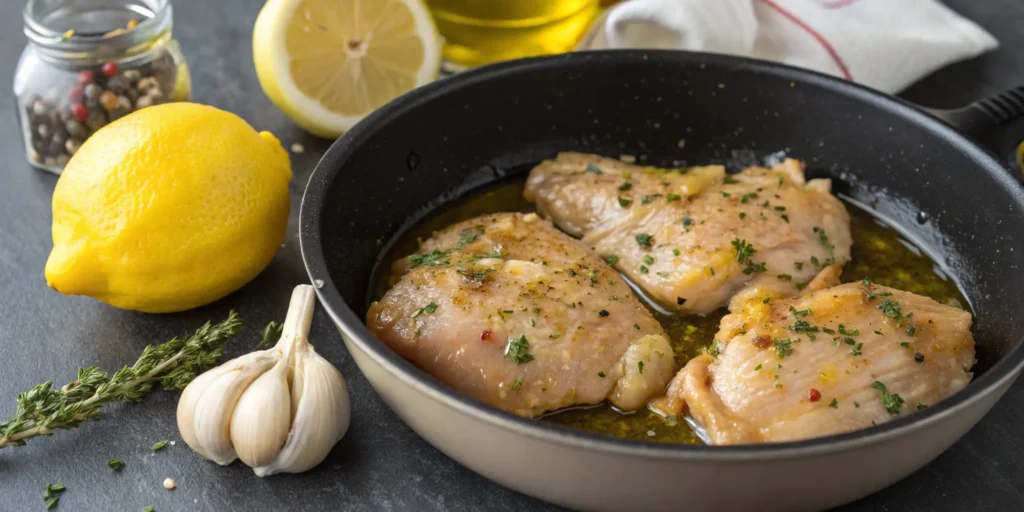
Recipe 3 – Lemon Garlic Blackstone Chicken Thighs
If you’re looking for something with a bright, zesty kick, these lemon garlic chicken thighs are the answer. The Blackstone’s searing heat locks in flavor while the citrus-garlic combo keeps every bite fresh and lively.
Ingredients
| Ingredient | Quantity | Notes |
|---|---|---|
| Chicken thighs | 1 lb | Boneless, skinless |
| Olive oil | 3 tbsp | Divided |
| Lemon juice | 2 tbsp | Freshly squeezed |
| Garlic cloves | 3 cloves | Minced |
| Dried oregano | 1 tsp | Adds a Mediterranean touch |
| Salt | ½ tsp | Adjust to taste |
| Black pepper | ½ tsp | Freshly ground |
| Lemon zest | 1 tsp | Optional, for extra flavor punch |
Instructions
- Make the marinade – In a bowl, mix 2 tbsp olive oil, lemon juice, garlic, oregano, salt, and pepper.
- Marinate chicken – Add chicken thighs, coat well, and let sit for at least 30 minutes (up to 2 hours for deeper flavor).
- Preheat your Blackstone to medium heat (around 350–375°F).
- Oil the surface with the remaining 1 tbsp olive oil.
- Place chicken on the griddle, smooth side down. Cook for 5–6 minutes on the first side.
- Flip and cook another 5–6 minutes, or until internal temp reaches 165°F.
- Garnish with lemon zest before serving for a fresh aroma.
Beginner Tip: Marinating your Blackstone chicken in a sealable plastic bag makes cleanup easier and ensures every piece is evenly coated in flavor.
This recipe pairs beautifully with grilled vegetables or a fresh salad, making it ideal for warm-weather dinners on the patio.
Pro Tips for Perfect Blackstone Chicken Every Time
Cooking chicken might seem simple, but the difference between “pretty good” and “mouthwateringly perfect” often comes down to the small details. Here’s how to take your Blackstone chicken from basic to unforgettable.
1. Master the Meat Thermometer
Relying on guesswork is one of the quickest ways to overcook or undercook chicken. Always use a digital meat thermometer and aim for 165°F at the thickest part. This ensures safety without drying it out.
2. Let the Chicken Rest Before Slicing
As tempting as it is to cut right in, give your chicken 5 minutes to rest after removing it from the griddle. This pause allows the juices to redistribute, keeping the meat moist instead of letting all that flavor run onto your cutting board.
3. Avoid Overcrowding the Griddle
If you pack too many pieces on the surface, you’ll trap steam and lose the sear that makes Blackstone chicken so irresistible. Leave space between pieces for even cooking and better browning.
4. Preheat Properly Every Time
A Blackstone that isn’t fully heated won’t sear your chicken properly. Give it 5–10 minutes to reach the right temperature before you start cooking.
5. Oil Both the Griddle and the Meat
Lightly brushing oil on both the chicken and the griddle helps prevent sticking and enhances flavor. Use oils with high smoke points like avocado, grapeseed, or canola.
6. Flip Only Once
Constant flipping disrupts the searing process and can make the surface unevenly browned. Place your chicken on the griddle, let it develop that golden crust, then flip it just once for the perfect finish.
7. Use Marinades and Dry Rubs Strategically
For Blackstone chicken, marinades add moisture and depth of flavor, while dry rubs give a bold, concentrated taste. Experiment to find your perfect balance — and always pat the chicken dry before cooking to avoid steaming.
These tips aren’t just for beginners — even seasoned cooks follow them because they work. Once you internalize these habits, cooking juicy, flavorful chicken will feel like second nature.
Common Mistakes Beginners Make (and How to Avoid Them)
When you first start cooking Blackstone chicken, it’s easy to make small errors that lead to dry, bland, or unevenly cooked results. Knowing what to watch for will save you frustration — and help you turn out perfect Blackstone chicken every single time.
1. Starting with Cold Meat
Putting cold Blackstone chicken directly on the griddle slows down the cooking process and prevents a proper sear. Let your Blackstone chicken sit at room temperature for about 20–30 minutes before cooking.
2. Skipping the Preheat
A properly preheated griddle is key for sealing in juices. If you skip this step, your Blackstone chicken will steam instead of sear, leading to a rubbery texture. Always heat the griddle for 5–10 minutes before placing your Blackstone chicken on it.
3. Overcrowding the Cooking Surface
If you pile too much Blackstone chicken on at once, you’ll drop the griddle’s temperature and trap steam, which can make your Blackstone chicken soggy. Work in batches to maintain heat.
4. Ignoring Internal Temperature
Guessing whether your Blackstone chicken is done can lead to undercooked or overcooked meat. Use a thermometer and remove your Blackstone chicken once it hits 165°F internally.
5. Not Letting It Rest
Cutting into Blackstone chicken immediately after cooking causes all the juices to escape. Rest your Blackstone chicken for a few minutes to keep it juicy.
6. Using the Wrong Oil
Low smoke point oils can burn and add bitterness to your Blackstone chicken. Stick to oils like avocado, canola, or grapeseed to keep your Blackstone chicken tasting fresh.
By avoiding these beginner mistakes, you’ll ensure your Blackstone chicken comes out consistently juicy, flavorful, and perfectly cooked — every time you fire up your Blackstone griddle.
Frequently Asked Questions About Blackstone Chicken
1. What’s the best cut of chicken for Blackstone chicken?
For most beginners, boneless skinless chicken breasts or thighs work best for Blackstone chicken. Thighs tend to be juicier, while breasts are leaner and cook faster. Both cuts adapt well to marinades and seasoning when making Blackstone chicken.
2. How long does it take to cook Blackstone chicken?
On a preheated griddle, Blackstone chicken usually takes 5–7 minutes per side depending on thickness. Always check the internal temperature — your Blackstone chicken should reach 165°F at its thickest point
3. Do I need to marinate Blackstone chicken before cooking?
While not mandatory, marinating Blackstone chicken enhances flavor and tenderness. Even a quick 30-minute marinade can make a noticeable difference in the final taste of your Blackstone chicken.
4. Can I cook frozen chicken on a Blackstone griddle?
Technically yes, but it’s not recommended. Frozen Blackstone chicken cooks unevenly and risks drying out. Thawing your Blackstone chicken first ensures even cooking and better flavor.
5. What temperature should I set for Blackstone chicken?
Medium to medium-high heat (around 350–375°F) is ideal for Blackstone chicken. This temperature range allows your Blackstone chicken to sear without burning while locking in juices.
6. How do I prevent Blackstone chicken from sticking?
Preheat the griddle and lightly oil both the surface and the Blackstone chicken. This prevents sticking and gives your Blackstone chicken that signature golden-brown crust.
7. Is Blackstone chicken healthy?
Yes — Blackstone chicken can be a healthy option, especially when you use lean cuts and minimal oil. Griddling allows excess fat to drain away, making Blackstone chicken a lighter choice compared to frying.
Conclusion – Your Blackstone Chicken Journey Starts Here
Cooking Blackstone chicken might seem intimidating at first, but as you’ve seen, it’s an accessible, rewarding skill that anyone can master. From juicy grilled breasts to flavorful teriyaki stir-fries and zesty lemon garlic thighs, the Blackstone griddle offers endless possibilities for delicious meals that bring joy to your table.
By following the basics, avoiding common pitfalls, and using the pro tips shared here, you’ll be able to serve up perfectly cooked Blackstone chicken every time — juicy, tender, and full of flavor. There’s nothing quite like the satisfaction of flipping your first golden-crisp piece of chicken and knowing you nailed it.
Now it’s your turn: fire up your Blackstone, pick your favorite recipe from this guide, and start cooking. Don’t forget to share your Blackstone chicken creations with friends and family — and let us know how it goes!
Ready to Master Blackstone Chicken?
- Bookmark this guide for easy reference next time you cook.
- Experiment with marinades, spices, and side dishes to make every meal unique.
- Join online Blackstone communities to swap tips, recipes, and success stories.
Cooking is more than just feeding yourself — it’s about creating memories, sharing flavor, and embracing the joy of home-cooked meals. Your perfect Blackstone chicken is just a griddle away.